Arduino のマルチタスクとクラスについて、勉強中です。

前回は、C++ のクラスを使用して複数の LED を独立して点滅させてみました。
でもまだまだ、わかったような、さっぱりわからんような (^_^;)
理解を深めるために、今回は、クラスを使ってサーボモータを動かしてみます。
Let’s apply the same principles to some servo code and get some action going.
https://learn.adafruit.com/multi-tasking-the-arduino-part-1/a-clean-sweep
いつもの方法でサーボモータを動かす
We’ll take the parts we need from it to make a “Sweeper” state machine.
https://learn.adafruit.com/multi-tasking-the-arduino-part-1/a-clean-sweep
まず、いつもの方法で、いやもちろん delay() は使わない方法、ステートマシンを作って、サーボモータを動かしてみましょう。

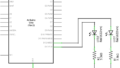
回路図です。
サーボモータって意外と電気食いますから、電源の 5V はしっかりしたものにしましょう。Arduino の 5V 出力は避けたほうがいいです。
電源の 330μF は、ちょっと大きすぎるかも。0.1μF は気分です (^_^;)
どちらもできるだけモータに近いところに付けます。
マルチタスクの演習なので、サーボモータを 2 台動かしたいところですが、部品箱には 1 台しかありません (;´Д`) でした。
スケッチです。
- #include <Servo.h>
- Servo myservo;
- const byte pin = 10;
- void setup() {
- myservo.attach(pin);
- }
- void loop() {
- static const byte updateInterval = 15;
- static unsigned long lastUpdate = 0;
- static byte pos = 0;
- static byte increment = 1;
- if (updateInterval < millis() - lastUpdate) {
- lastUpdate = millis();
- pos += increment;
- myservo.write(pos);
- if (180 <= pos || 0 >= pos) increment = -increment;
- }
- }
ここはもう説明するほどの内容ではないです、よね。
2 台のサーボモータを動かすには、「Arduino のマルチタスク (2) 複数のステートマシン」でやったように、2 つ目のステートマシンを作成すればよいです。
サーボモータの制御をカプセル化する
上で作ったスケッチを、クラスにカプセル化してみましょう。
- class Sweeper {
- Servo myservo;
- byte updateInterval;
- unsigned long lastUpdate;
- byte pos;
- byte increment;
まず、Sweeper クラスを宣言します。
4 行目は Servo.h ライブラリのオブジェクト myservo を生成します。つまり、このライブラリもクラスを利用しているってことですね。だんだん言葉の意味がわかってきました。
5~8 行目はメンバ変数です。
- public:
- Sweeper(byte interval) {
- updateInterval = interval;
- lastUpdate = 0;
- pos = 0;
- increment = 1;
- }
次はコンストラクタで、メンバ変数を初期化します。
コンストラクタはクラス名を関数名とします。引数にサーボモータの制御速度変数 interval を指定していて、interval ミリ秒毎にサーボモータが動作します。ただし、変数の型を byte にしていますので、引数として指定できるのは 0~255 の範囲です。
コンストラクタには戻り値がありません。void も記述しません。
- void Attach(byte pin) {
- myservo.attach(pin);
- }
サーボモータをデジタルピンに関連付けるためのメンバ関数です。
We also need to add Attach() and Detach() functions to associate the servo with a specific pin:
https://learn.adafruit.com/multi-tasking-the-arduino-part-1/a-clean-sweep
参考にしている Multi-tasking the Arduino – Part 1 では、ピンへの関連付けを解除する Detach() も定義していますが、これ使ってないのでいりません。いらないと思います。たぶん。
- void Update() {
- if (updateInterval < millis() - lastUpdate) {
- lastUpdate = millis();
- pos += increment;
- myservo.write(pos);
- if (180 <= pos || 0 >= pos) increment = -increment;
- }
- }
- };
サーボモータを制御するメンバ関数。いつもの方法の loop() に書いていた内容です。
以上で Sweeper クラスのカプセル化ができました。
クラスでサーボモータを動かす
これで、必要なサーボモータの数だけオブジェクトを作ることができるようになりました。生成されたオブジェクトのことをインスタンスとも呼びます。
Sweeper の各インスタンスに必要なコードは 3 行だけです。
Each instance of a Sweeper requires just 3 lines of code:
https://learn.adafruit.com/multi-tasking-the-arduino-part-1/a-clean-sweep
・One to declare the instance
・One to attach it to a pin in setup
・And one call to update in the loop
- #include <Servo.h>
- class Sweeper {
- Servo myservo;
- byte updateInterval;
- unsigned long lastUpdate;
- byte pos;
- byte increment;
- public:
- Sweeper(byte interval) {
- updateInterval = interval;
- lastUpdate = 0;
- pos = 0;
- increment = 1;
- }
- void Attach(byte pin) {
- myservo.attach(pin);
- }
- void Update() {
- if (updateInterval < millis() - lastUpdate) {
- lastUpdate = millis();
- pos += increment;
- myservo.write(pos);
- if (180 <= pos || 0 >= pos) increment = -increment;
- }
- }
- };
- Sweeper sweeper1(15);
- void setup() {
- sweeper1.Attach(10);
- }
- void loop() {
- sweeper1.Update();
- }
2 台目のサーボモータを制御するには、
- 32 行目のオブジェクトの生成を増やす
- 35行目の接続するピン番号指定を増やす
- 39行目の Update() の呼び出しを増やす
ということです。
では次回は、先に作った Flasher クラスを加えて、LED の点滅とサーボモータの制御を、それぞれ独立して行えるようにしてみましょう。